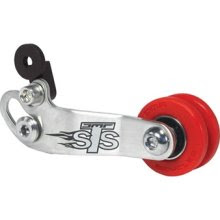
The simple tension seeker (STS) by DMR Bikes should not really be called a chain tensioner , but rather a slack-remover. It's an incredibly simple solution for those looking to convert a bike with vertical dropouts for single speed use. DMR is a UK-based company that specializes in downhill, freeride, and dirt jump chain devices, and the STS reflects this design experience in this burly device. Installation is a 5-minute job (assuming you have already replaced your cassette with a cog, and shortened your chain as much as possible). Simply remove the skewer nut and slide the black aluminum mounting bracket onto the dropout. Then loosely bolt the stainless steel arm to the bracket and the derailleur hanger with two 5mm bolts. Replace the skewer nut. Rotate the cranks until the chain is at its tightest. (Very few chainrings and cogs are perfectly round.) Lift up on the arm so that the red pulley pushes the chain upward, removing the slack, and tighten the two 5mm bolts. That...


Comments
Post a Comment